
Stepper motors are widely used in 3D printers, CNC machines, robotics, and automation systems where precise position control is required. This beginner-friendly guide explains how stepper motors work, their types, how to select the right motor, and how to use them in real projects with practical explanations.
Understanding Stepper Motors
Imagine a motor that moves in slow, regulated steps instead of in circles. Stepper motor magic is just that! These technical wonders pull the rotor—the spinning part—around in precise increments by using electromagnetic coils to create a revolving magnetic field. Steppers, in contrast to their DC counterparts, provide discrete control, which makes them the ideal option for applications that need accuracy and consistency.
Why do we use stepper motor?
In this stepper motor guide, for those new to the world of electronics and robotics, going into the area of motors can feel frightening. A picture of frustration and technological difficulties is frequently depicted by wires, circuits, and intricate control systems. But do not worry, would-be makers! Stepper motors offer a spark of hope for novices alike, combining straightforward connection and accurate control into a harmonious whole. Here are few points that can answer the questions like – Why do I need a stepper motor? Why do we use stepper motor? When should a stepper motor be used? Why stepper motors are widely used? etc.
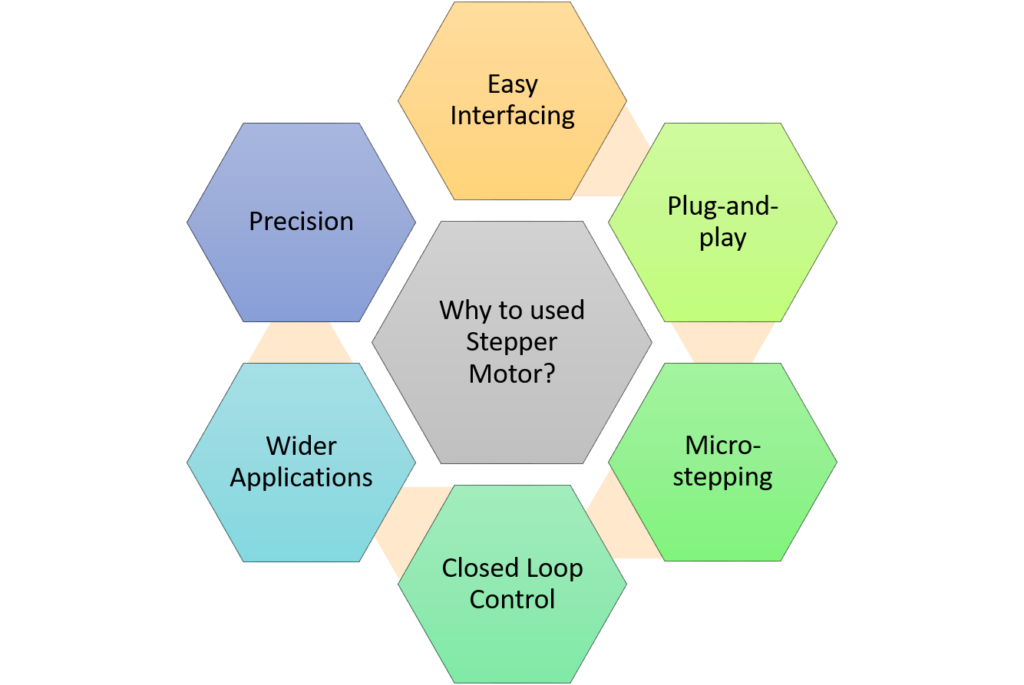
Precision
Stepper motors are not like their continuous-spin siblings (Simple DC Motors); they do more than merely whirr. They move in deliberate, measured steps, similar to a painstaking tailor creating a work of art. For beginners, this unmatched control opens up a world of possibilities, enabling you to: Create complex designs; Direct robotic movements; Activate musical instruments; and much more.
Easy Interfacing
Are you worried about understanding intricate circuits and code? Steppers facilitate the process of transferring your thoughts into tangible reality. A few instances include microcontroller-compatible, In order to translate the digital commands from your microcontroller into the language of magnetic fields and accurate rotations, dedicated drivers serve as interpreters. Many stepper motors include pre-soldered connectors and simple wire configurations. This “plug-and-play” method makes soldering even for individuals with little experience a simple process.
Beyond the Basics
Stepper motors have a surprising depth for those who want to explore, even if their ease of use is a big selling point. You can explore topics like Sensor Integration, Closed-Loop Control, Microstepping Magic, and more as your confidence increases.
A Stepping Stone to Endless Possibilities
Stepper motors are an invitation to explore, create, and innovate—they are more than simply tools. Thanks to the magic of precise control and simple connection, they provide newcomers with a smooth entrance point and enable them to develop projects that were previously unthinkable.
Stepper Motor Fundamentals [Stepper Motor Guide]
Basic operating principle of stepper motors
At first look, stepper motors—those marvels of controlled movement—might appear to be miraculous machines. However, the clever engineering and exquisite interaction of electromagnetic forces are what give them their charm. Let’s explore the inner workings of their mechanism, dissecting the complex dance of revolving magnetic fields, electrified coils, and step-by-step movement.
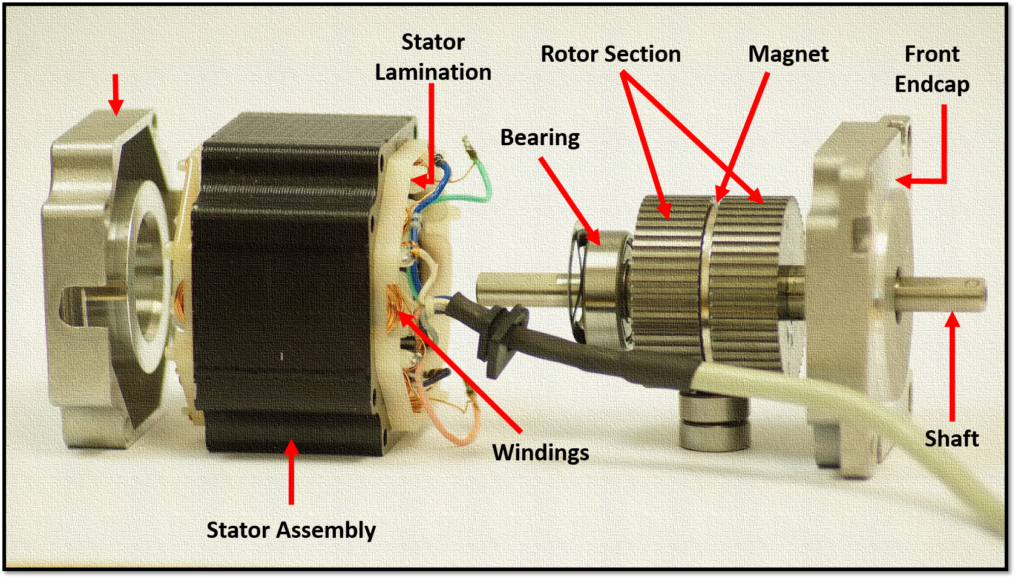
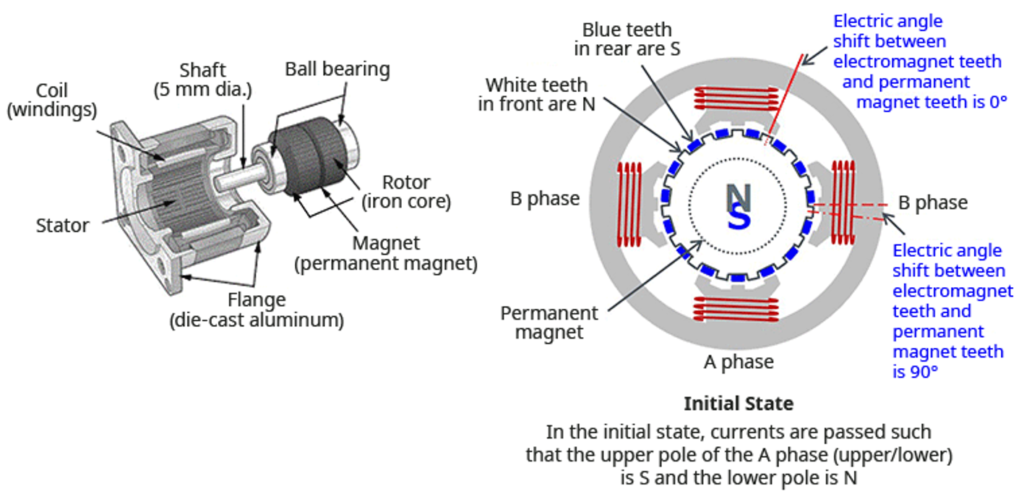
The Anatomy of a Stepper Motor
Consider a system where permanent magnets provide a constant magnetic field, and electromagnetic coils control the motion. The coils are arranged in pairs or phases around an iron toothed rotor. The permanent magnets create a steady magnetic field that extends throughout the entire region.
Energizing the Coils and the Dance Begins
When electricity passes through the coils, the spectacle begins. This produces a magnetic field of its own and engages in an interesting tug-of-war with the field of the permanent magnet. Depending on the precise phase sequence (the order in which the coils are energized), the resulting magnetic field pulls and pushes on the rotor teeth, causing it to rotate.
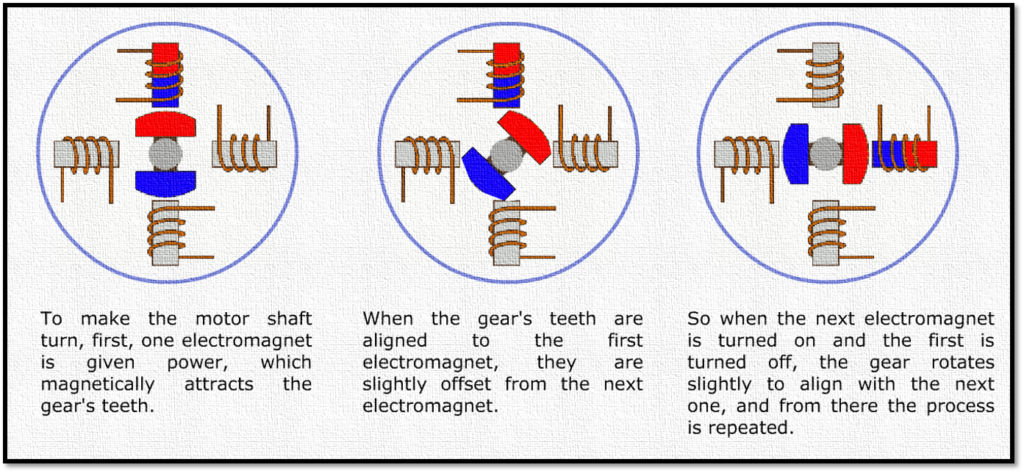
Rotating the Field, Rotating the Rotor
Imagine the coils as dancers sharing a baton, each one energizing the next. The rotor teeth are pulled toward the permanent magnet by the interaction between the temporary magnetic field produced by each coil and the permanent magnet. The next coil assumes control as the baton moves on, producing a fresh magnetic field that forces the rotor farther. The energizing and de-energizing coils dance in a sequential fashion, producing the rotor’s step-wise movement.
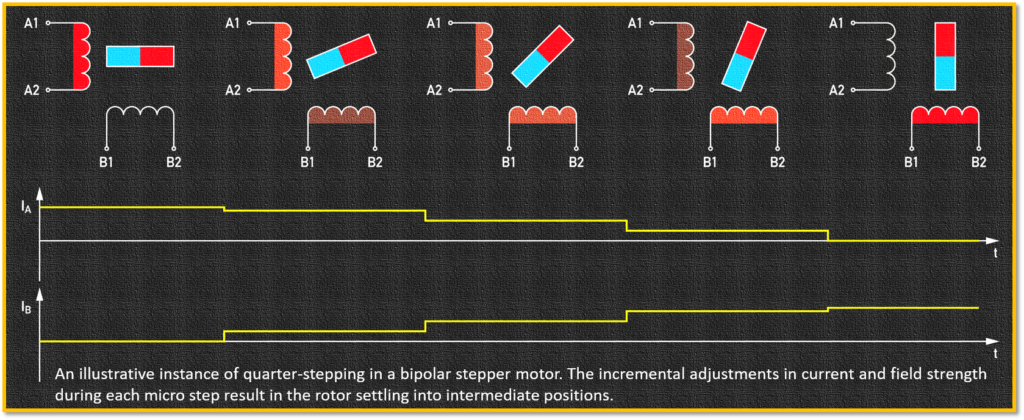
Art of Microstepping: Dividing the Steps for Smoother Motion
Microstepping divides each full step into smaller electrical increments, resulting in smoother motion and reduced vibration, commonly used in 3D printers. The magnetic field varies in tiny steps as a result of the coils receiving smaller current bursts, giving the rotor even smaller steps. This produces movement that is smoother and more polished, making it perfect for robotic arms and 3D printing applications.
Detent Torque vs Holding Torque
Detent Torque
Detent torque in stepper motor is the small resistance you feel when you try to turn a stepper motor by hand when it is not powered. Even without electricity, the permanent magnets inside the motor interact with the metal parts, making the shaft want to stop at certain positions. This creates a slight “clicking” or resisting feel as you turn it. In simple terms – Detent torque is the motor’s natural tendency to resist movement when it is turned off.
Holding Torque
It is the motor’s ability to stay in one position when it is powered on. When electricity flows through the motor coils, the motor actively locks the shaft in place and resists any force trying to move it. In other words and easy to understand way – Holding torque is how strongly the motor can hold its position when it is turned on.
For better understanding, the variation of the holding and detent torque with the shaft angle is given below in the plot:

The Role of Drivers and Microcontrollers
Stepper motors require a controller to direct their motions (direction and speed). Drivers are electronic devices that take commands from microcontrollers such as Arduino and perform this task. The direction and speed of the rotors are controlled by these drivers, which convert the digital inputs from the microcontroller into the proper sequence and amount of electrical current to energize the coils. Below Image show the role of micro-controller and driver for working of stepper motor.
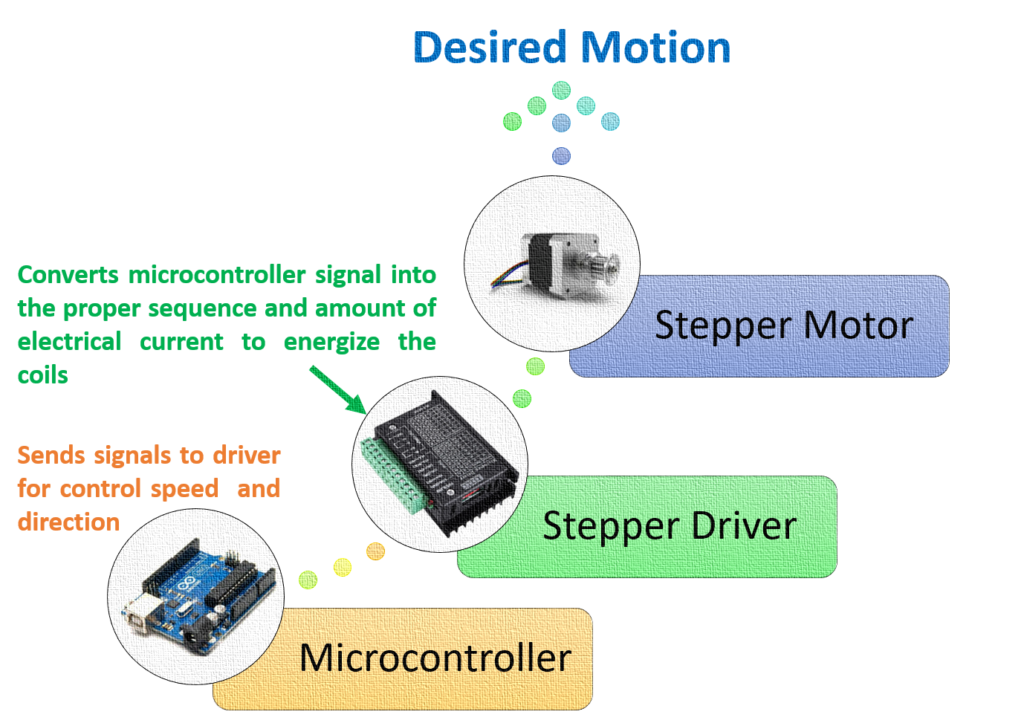
Further, the demonstration of role of micro-controller and stepper driver has been demonstrated by me in the ‘Practical Example’ section.
Optimizing Step Sequences and Power Consumption
Selecting the ideal step sequence greatly affect the efficiency of your stepper motor. Understanding the interplay between the magnetic fields and using strategies.
Optimizing Step Sequences
As we know, stepper motor moves in small steps. The step sequence is the order in which the motor coils are turned on and off to make the motor move. Optimizing the step sequence means:
- Choosing the best order to turn the coils on
- Making the motor move smoothly
- Reducing vibration and noise
- Getting accurate positioning
It means using the right stepping pattern so the motor moves smoothly and correctly.
Optimizing Power Consumption
Stepper motors use electricity even when they are not moving. If too much power is used, the motor can get hot and waste energy. Optimization of power consumption by stepper motor can be achieved by:
- Using only as much current as needed
- Reducing power when the motor is idle
- Avoiding unnecessary heating
It is done for saving electricity while still keeping the motor working properly.
Different Types of Stepper Motors
There three types of stepper motors based on their construction:
- Permanent Magnet (PM) Stepper Motor,
- Variable Reluctance (VR) Stepper Motor, and
- Hybrid Stepper Motor (Most Common)
Stepper motor’s each type serving a broad variety of motion needs and each having its own strengths and shortcomings. We are going to take you on a tour to meet these interesting individuals today, where we will analyze their traits and determine which stage best suits them.
Permanent Magnet (PM) Steppers – The Workhorse
Permanent Magnet (PM) stepper motors are widely used and are especially suitable for beginners because they are simple, reliable, and affordable. They are commonly chosen for basic motion control applications where good torque and low cost matter more than extremely high precision. These motors can produce enough torque for practical uses such as 3D printers, CNC machines, and small automation systems that require steady and dependable movement. Typically, PM stepper motors offer 40 to 100 steps per revolution, which is adequate for many general-purpose tasks, even though they are not intended for very fine positioning. One of their main advantages is their low price, making them a popular option for students and budget-conscious projects. However, due to their simple construction, they can be slightly noisier, especially when operated at higher speeds.
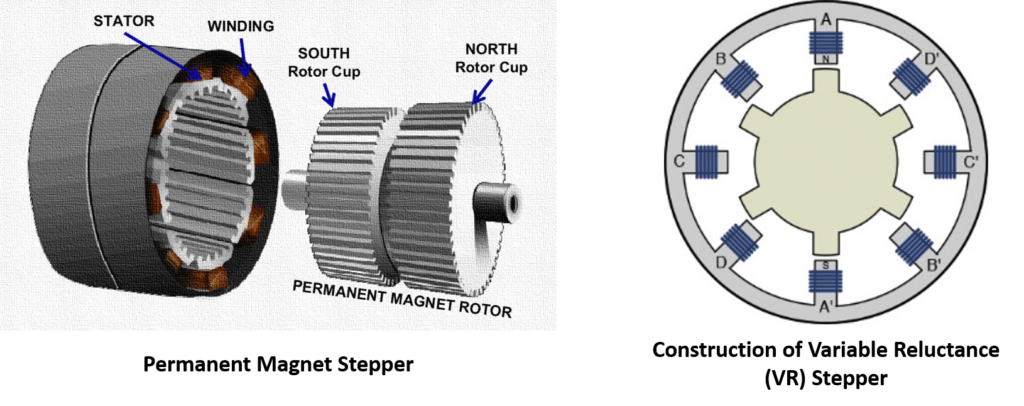
Variable Reluctance (VR) Steppers – The Muscle Bound
Variable Reluctance (VR) stepper motors are designed for applications where high torque and strength are the top priorities. These motors are capable of handling heavy loads and are often used in demanding industrial environments. However, their strong torque comes with lower precision, as VR steppers typically offer only 25 to 50 steps per revolution, making them less suitable for applications that require fine positioning. Compared to permanent magnet stepper motors, VR steppers are generally more expensive, and their unique operating principle often requires specialized drivers, which increases the overall complexity of the system
Hybrid Synchronous Steppers – The Graceful Hybrid
Hybrid synchronous stepper motors combine good torque with high precision, making them one of the most widely used stepper motor types. Although they do not produce as much torque as variable reluctance steppers, they still provide sufficient power for most practical applications. One of their biggest advantages is their high step resolution, typically 200 or even 400 steps per revolution, which allows very accurate positioning and smooth motion. In terms of cost, hybrid steppers are moderately priced, offering a good balance between performance and affordability. Their smoother operation also results in lower noise levels compared to permanent magnet stepper motors.
The stepper motor family extends beyond these core types, each offering unique strengths for specific needs.
- Unipolar vs. Bipolar Steppers: Unipolars are simpler to wire but offer lower torque, while bipolars require more complex connections but deliver higher power.
- Stepper Servos: Combining stepper technology with servo control mechanisms, these offer high precision and dynamic response times for demanding applications.
- Linear Steppers: Unlike their rotary counterparts, linear steppers move in a straight line, perfect for tasks like laser cutting or robotic arm movements.
For, summarizing and short comparison between these all three types of stepper motor, I am adding a comparison table below:
| Type | Strength | Accuracy | Common Use |
|---|---|---|---|
| Permanent Magnet | Low | Medium | Simple projects |
| Variable Reluctance | Low | Medium | Older systems |
| Hybrid | High | High | 3D printers, CNC |
How to choose a stepper motor/[Stepper Motor Guide] Selection Guide
Stepper motors come in many types with different strengths, speeds, sizes, and step accuracy. Choosing the right stepper motor for your project is like picking the right tool for a job — each feature matters and affects how well it works. Now that you know the basic options, let’s learn how and on what factors, to choose the best stepper motor for your project.
Torque: The King of Power
Imagine a sculptor using a chisel to shape stone. The strength of the chisel decides how easily the stone can be carved. In the same way, torque is the strength of a stepper motor. It tells us how much load the motor can move and how well it can overcome resistance. Torque is the first thing to consider because it decides whether the motor can do the job properly.
Need high torque for heavy loads?
☐ Choose Permanent Magnet (PM) or Hybrid Synchronous Stepper Motors
✔ Ideal for 3D printers, CNC machines, and heavy-duty motion tasks
Need precise, delicate control rather than raw power?
☐ Choose Variable Reluctance (VR) Stepper Motors
✔ Best for robotic arms, fine positioning, and precision adjustments
✔ Lower torque, higher control accuracy
Need a balance between torque and smooth operation?
☐ Choose Hybrid Stepper Motors
✔ Suitable for camera rigs, automated musical instruments, and general-purpose applications
Speed & Motion Selection Checklist
The speed at which your stepper motor completes its spins is determined by its composition. Cycle times, overall efficiency, and productivity are all impacted by this characteristic.
- Does your project require fast movement?
Consider stepper motors with high RPM, quick response, and low lag
Examples: laser cutting, high-speed 3D printing - Is smooth, slow, and precise motion more important than speed?
Choose motors designed for stable low-speed performance
Examples: time-lapse systems, robotic arm control - Do you need flexibility without changing the motor?
Use gearing to adjust output- Increase speed → reduce torque
- Increase torque → reduce speed
Precision: Step Resolution and Stepper Motor Guide
Imagine a painter using very small brushstrokes to create a realistic picture. Step resolution—the number of steps a motor can take in one full turn—is like how precise the brush is. Higher resolution means smoother and more accurate movement
| Project Requirement | Recommended Step Resolution | Why It Works | Example Applications |
|---|---|---|---|
| Very high precision and fine detail | High resolution (≈ 400 steps/rev) | Provides extremely accurate positioning and smooth motion | Laser engraving, intricate robotic movements |
| Moderate precision with cost efficiency | Low to medium resolution (≈ 40–100 steps/rev) | Sufficient accuracy while reducing cost and system complexity | Basic positioning systems, simple mechanisms |
| Need smoother motion without changing motors | Use micro-stepping | Divides each step into smaller increments for improved smoothness and control | 3D printing, camera sliders, precision adjustments |
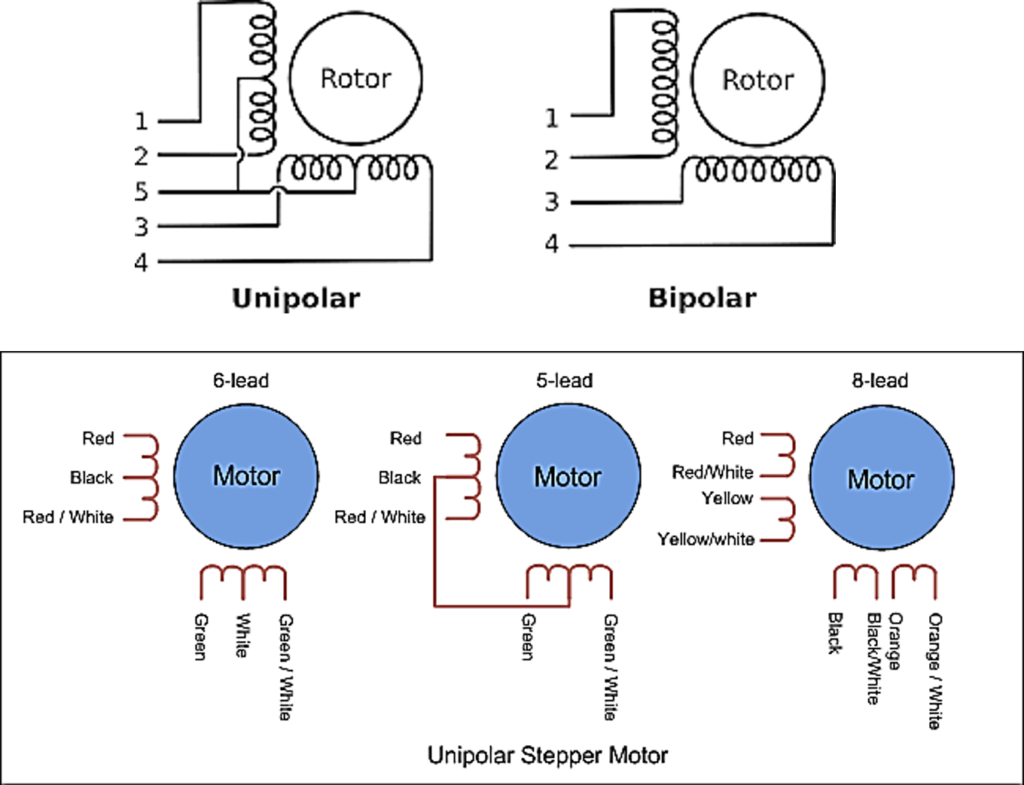
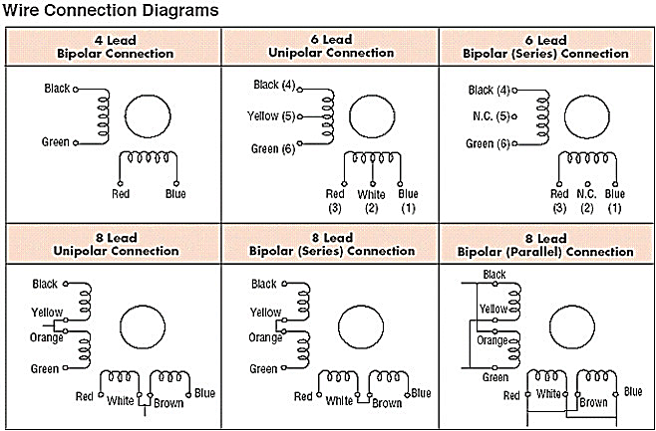
Connection and Interfacing: Phase Configurations and Their Nuances
Just as languages have different dialects, stepper motors come in two “dialects” – unipolar and bipolar. Choosing the right one depends on your project’s complexity and desired control.
- Unipolar Simplicity: Unipolar motors are easier to wire, requiring only two connections per phase. They’re ideal for beginners and projects with limited control requirements.
- Bipolar Precision: Bipolar motors offer greater torque and controllability, requiring four connections per phase. They’re the preferred choice for demanding applications requiring precise positioning and dynamic movement.
Size: Finding your fit
The size of your stepper motor should be appropriate for your project’s space constraints and power needs.
| Decision Factor | Small Stepper Motor | Large Stepper Motor |
|---|---|---|
| Project size | Compact projects | Large-scale projects |
| Available space | Limited space | Ample space |
| Weight constraints | Strict weight limits | Fewer weight restrictions |
| Torque output | Low torque | High torque |
| Step resolution | Typically higher | Typically lower |
| Best suited for | Mini robots, automated instruments | CNC machines, industrial equipment |
| Key consideration | Saves space and weight | Delivers power for heavy loads |
Advanced Parameters for Choosing Stepper Motor
The world of stepper motors offers a treasure trove of advanced parameters for those seeking even greater control and optimization. Explore these gems:
- Detent Torque: This “detent power” keeps the motor in position even when unpowered, ensuring stability and positional accuracy.
- Current Rating and Power Consumption: Choose a motor with a current rating that meets your project’s needs without exceeding its limits, optimizing power consumption and preventing overheating.
- Thermal Considerations: Steppers generate heat. Ensure proper ventilation and heat sinks for high-power applications to maintain motor health and performance.
- Driver Compatibility: Match your motor’s voltage and phase configuration with the capabilities of your chosen driver for seamless integration and optimal control.
Now, it’s time to transform theory into practice! Here’s a roadmap for selecting the perfect stepper motor for your project:

Practical Example: Controlling a Stepper Motor with Arduino
Understanding theory is important, but the real confidence comes when you actually make a stepper motor move. In this practical example, we will control a stepper motor using an micro-controller and a commonly used stepper motor driver. This simple setup is ideal for beginners who want to get started with motion control projects.
Components Required
To follow this example, you will need:
- Microcontroller: Arduino/NodeMCU (or compatible board), etc.
- Stepper motor (e.g., NEMA 17)
- Stepper motor driver (A4988 or DRV8825)
- External power supply (12V recommended for NEMA 17)
- Breadboard and jumper wires
Important: A stepper motor should never be connected directly to an micro-controller. A driver is required to safely control current and direction.

Understanding the Role of the Driver
The stepper motor driver acts as a translator between the micro-controller and the motor.
The micro-controller sends simple digital signals, and the driver converts them into precise current pulses required to rotate the motor step by step.


Key control pins used:
- STEP → Controls how many steps the motor moves
- DIR → Controls rotation direction
- ENABLE (optional) → Turns the driver on or off
Basic Wiring Explanation
- Connect the STEP pin of the driver to micro-controller digital pin 3
- Connect the DIR pin of the driver to micro-controller digital pin 2
- Connect GND of micro-controller and driver together
- Power the motor using an external supply through the driver

This simple wiring allows micro-controller to fully control the motor’s movement. The Proper connection of Stepper motor wire to A4988 stepper motor driver is explained in detail –Stepper Motor Connection and Wiring

The interfacing of stepper motor with various types of stepper drivers and micro-controllers are discussed in this article – Stepper Motor Connection and Wiring
Arduino Code Example (Beginner Friendly)
Below is a simple Arduino sketch that rotates the stepper motor using simple pulse.
#define DIR D2
#define STEP D3

void setup() {
  pinMode(DIR, OUTPUT);
  pinMode(STEP, OUTPUT);
}

void loop() {
  // Rotate motor clockwise
  digitalWrite(DIR, HIGH);

 digitalWrite(STEP, HIGH);
  delay(100);
digitalWrite(STEP, LOW);
  delay(100);
}
This Arduino code demonstrates the basic control of a stepper motor using a STEP and DIR type driver such as A4988 or DRV8825. The DIR pin sets the rotation direction, while the STEP pin receives pulses to move the motor one step at a time. By adjusting the delay between STEP pulses, the motor speed can be easily controlled, making this example ideal for beginners to test wiring, understand stepper motor operation, and verify driver connections before moving on to advanced motion control techniques.
Below is a simple Arduino sketch that rotates the stepper motor forward and backward.
#define DIR 2
#define STEP 3
void setup() {
  pinMode(DIR, OUTPUT);
  pinMode(STEP, OUTPUT);
}
void loop() {
  // Rotate motor clockwise
  digitalWrite(DIR, HIGH);
  for (int i = 0; i < 200; i++) {
    digitalWrite(STEP, HIGH);
    delayMicroseconds(800);
    digitalWrite(STEP, LOW);
    delayMicroseconds(800);
  }
  delay(1000);
  // Rotate motor counter-clockwise
  digitalWrite(DIR, LOW);
  for (int i = 0; i < 200; i++) {
    digitalWrite(STEP, HIGH);
    delayMicroseconds(800);
    digitalWrite(STEP, LOW);
    delayMicroseconds(800);
  }
  delay(1000);
}
Understanding the Code, Common Mistakes, and Real-World Applications
This simple Arduino example demonstrates the basic logic behind stepper motor control and helps beginners understand how digital signals translate into precise mechanical movement. In this setup, every HIGH–LOW pulse sent to the STEP pin instructs the driver to move the motor by one discrete step. For most standard stepper motors, 200 steps equal one full revolution, which allows highly accurate position control.
The DIR pin determines the direction of rotation. Changing its logic level instantly reverses the motor’s direction without altering the wiring. Motor speed is controlled using the delayMicroseconds() function—shorter delays result in faster rotation, while longer delays slow the motor down. This approach makes it easy to experiment with speed and direction without involving complex calculations or advanced libraries, which is ideal for beginners.
While this control method is simple, there are a few common mistakes that beginners should avoid to ensure safe and reliable operation:
- Never power a stepper motor directly from the Arduino, as this can permanently damage the board
- Always connect a common ground between the Arduino and the motor driver
- Set the correct current limit on the driver before running the motor
- Avoid running the motor at very high speeds without sufficient torque or proper tuning
Preventing these issues helps achieve smooth motion, protects components, and improves overall system reliability.
This exact stepper motor control method is widely used in real-world applications such as:
- 3D printers for precise layer positioning
- CNC machines for accurate tool movement
- Camera sliders for smooth and repeatable motion
- Robotic arms for controlled joint movement
- Automated positioning and pick-and-place systems
Once you are comfortable with this basic example, it becomes much easier to move toward advanced concepts such as microstepping for smoother motion, acceleration and deceleration control, and multi-axis motion systems.
Overall, this practical example bridges the gap between theory and real-world implementation. Instead of only understanding what a stepper motor is, beginners gain hands-on knowledge of how to control one, which forms the foundation of nearly every precision motion and automation project.
Conclusion
With its thorough coverage of the common question on stepper motor guide (like When should a stepper motor be used), fundamentals, types, how to choose stepper motors for your project or application, and advanced parameters, this comprehensive guide will take you from stepper motor novice to master. We’ll explain technical terms, offer motivational tasks, and provide you with tools to support your stepper motor explorations! Prepare to enter a world of precise movement and limitless opportunities!
FAQs
Q1.Can I connect a stepper motor directly to an Arduino?
No. A stepper motor draws much more current than an Arduino can safely provide. Always use a stepper motor driver to protect the Arduino and ensure proper motor control.
Q2. Why does my stepper motor vibrate but not rotate?
This usually happens due to incorrect wiring, wrong phase connection, or insufficient current. Double-check the motor wiring, ensure the driver current is set correctly, and verify that the STEP and DIR signals are working.
Q3. How do I control the speed of a stepper motor?
Speed is controlled by the rate of pulses sent to the STEP pin. Reducing the delay between pulses increases speed, while increasing the delay slows the motor down.
Q4. Why does the stepper motor get hot during operation?
Stepper motors naturally generate heat, especially when holding position. However, excessive heating usually means the driver current is set too high. Adjusting the current limit can significantly reduce heat.
Q5. What is microstepping, and do beginners need it?
Microstepping divides each full step into smaller steps, resulting in smoother motion and reduced vibration. While not mandatory for beginners, it is highly recommended for applications like 3D printers and CNC machines.
Q6. Is a stepper motor better than a servo motor for beginners?
It depends on the application. Stepper motors are ideal for precise position control, while servo motors are better for closed-loop control with feedback. Beginners often start with stepper motors for motion-based projects.
[…] stepper motor is a DC motor that rotates in small steps instead of continuous rotation. Each electrical pulse moves the motor by one step, allowing very precise motion […]