The world of stepper motors is the dance of accuracy, the symphony of regulated movement, and the complex steps that give machines life. And in this exciting world, Arduino and the L298N show themselves to be a strong team, equipped to steer your projects with unwavering precision.
This thorough tutorial uses the widely available L298N driver to delve deeply into the core of Arduino stepper motor control. This adventure will provide you the information and useful abilities to fully realize the potential of these formidable engines, regardless of your level of experience.
Understanding Stepper Motors
Let’s set the scenario by identifying the participants before we dive into the magic of Arduino and the L298N. Stepper motors don’t rotate nonstop like their DC counterparts do. Rather, they travel in small, exact steps, providing unparalleled control and accuracy in positioning. They are therefore perfect for uses in robotics, CNC machines, 3D printers, and even musical instruments.
Stepper motors come in a variety of forms, each with unique characteristics and advantages. The following are some important figures you’ll meet:
- Unipolar vs. Bipolar: Unipolar devices use a single polarity with a center tap, but bipolar devices need to switch the polarity of each coil in order to move. Bipolar people are the target market for the L298N.
- Variable Reluctance vs. Permanent Magnet: Variable reluctance motors depend on fluctuating magnetic fields, whereas permanent magnets offer consistent torque.
- Hybrid: Offering great torque and smooth operation, hybrid designs include elements of both permanent magnet and variable reluctance designs.
Know the L298N Driver
To novices, the L298N driver may appear to be a mysterious entity. However, among hobbyists and robotics enthusiasts, the name is spoken with reverence. But do not worry! By breaking down its internal components, this tutorial will transform the L298N from an enigmatic chip into an amiable conductor of your stepper motor’s dance.
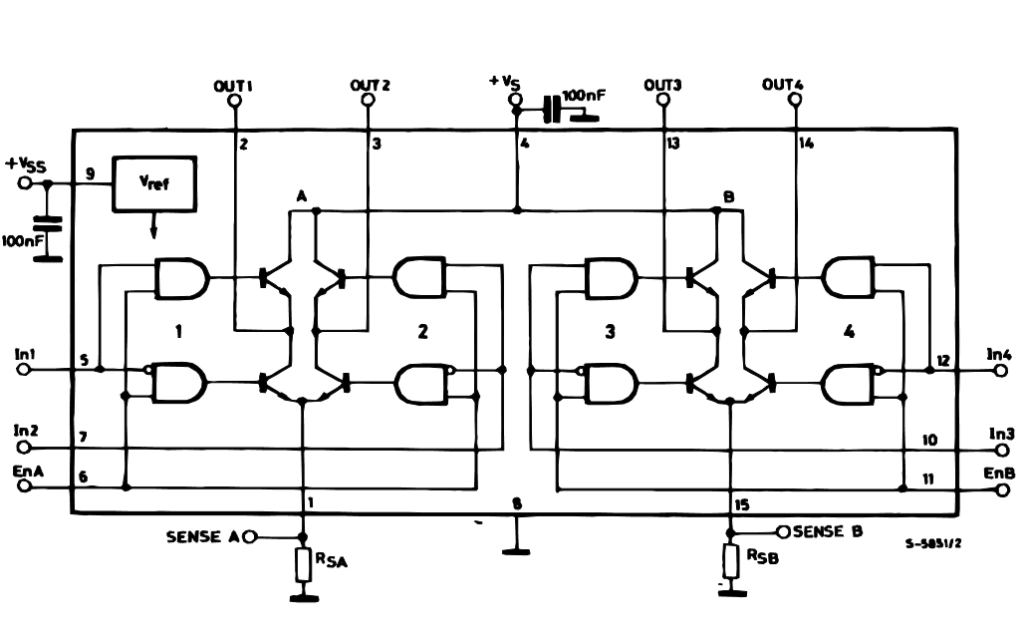
Consider a bridge with two directions: The L298N’s central metaphor is this. Every path is an H-bridge, which has two ways of control over the flow of current. Imagine your reliable stepper motor being powered by electrical coils instead of automobiles.
Pins of L298N Driver
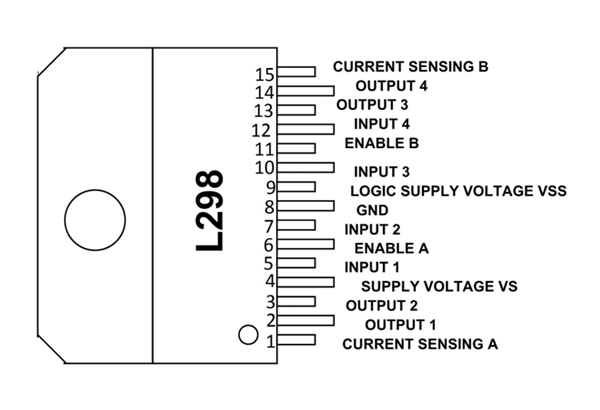
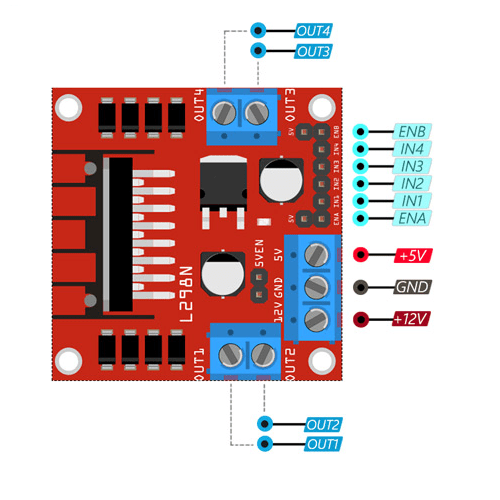
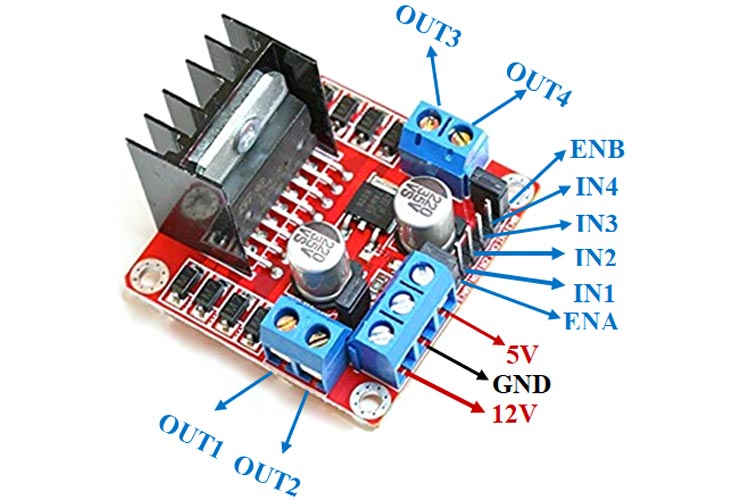
- Input Pins (IN1, IN2, IN3, IN4): These are the conductors, receiving commands from your Arduino (or other microcontroller) about which path to activate.
- Enable Pins (EN1, EN2): These act like toll booths, controlling whether current flows through the bridge at all.
- Output Pins (OUT1, OUT2, OUT3, OUT4): These are the exits, directing the current to the appropriate motor coils based on the chosen path.
How L298N Driver Works
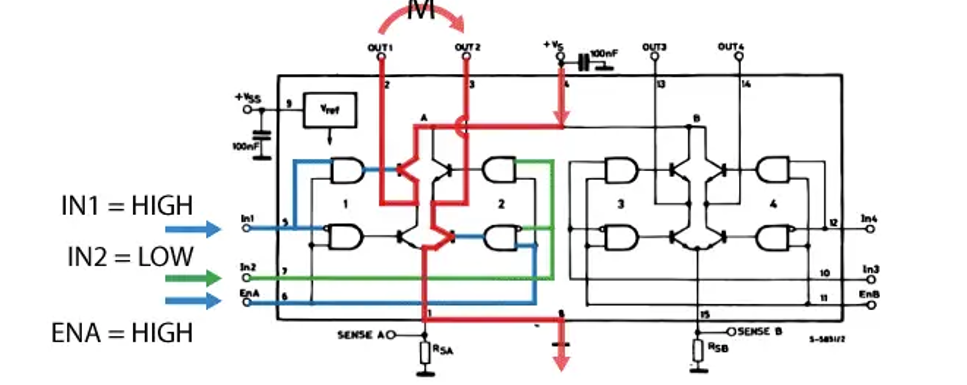
- Forward Step: Arduino sends signals to activate IN1 and IN2, opening the “forward” path of the bridge. Current flows through OUT1 and OUT2, energizing the coils to pull the motor one step forward.
- Backward Step: Switching to IN3 and IN4 opens the “backward” path, reversing the current flow through OUT3 and OUT4, making the motor take a step back.
- Standing Still: Both Enable pins stay low, like closed toll booths, blocking current flow across the bridge, and the motor holds its position.
L298N has more tricks
- Adjustable Current Limit: Like a dimmer switch, this lets you tailor the power to your specific motor, preventing overheating.
- Thermal Protection: A built-in safety net automatically shuts down if things get too hot, keeping your precious driver safe.
- Dual Channels: Control two bipolar stepper motors or one unipolar motor with center tap, doubling the fun!
Technical Specifications and Data Sheet of L298N
| Motor output voltage | 5V – 35V |
| Motor output voltage (Recommended) | 7V – 12V |
| Logic input voltage | 5V – 7V |
| Continuous current per channel | 2A |
| Max Power Dissipation | 25W |
If you want to get more detail about L298N Motor Driver, Please download and read the datasheet given below:
Stepper Motors with Arduino and the L298N
Are you prepared to unleash the controlled wrath of your stepper motors with the L298N and Arduino, the formidable pair? You will gain the information and useful techniques from this book to master this electromechanical tango!
Main Components Needed for Arduino Stepper Motor Control using L298N
- Stepper Motor: The star of the show, your stepper motor moves in precise, incremental steps, perfect for robots, 3D printers, and CNC machines. Types include unipolar, bipolar, and hybrid, each with unique characteristics.
- L298N Driver: The conductor of the orchestra, this dual H-bridge driver translates Arduino’s digital signals into electrical currents that energize the motor coils in the correct sequence, dictating its direction and movement.
- Arduino Uno: The mastermind, this programmable microcontroller sends commands to the L298N based on your code, dictating the motor’s movement.
Interfacing Stepper Motor with L298N and Arduino Pin
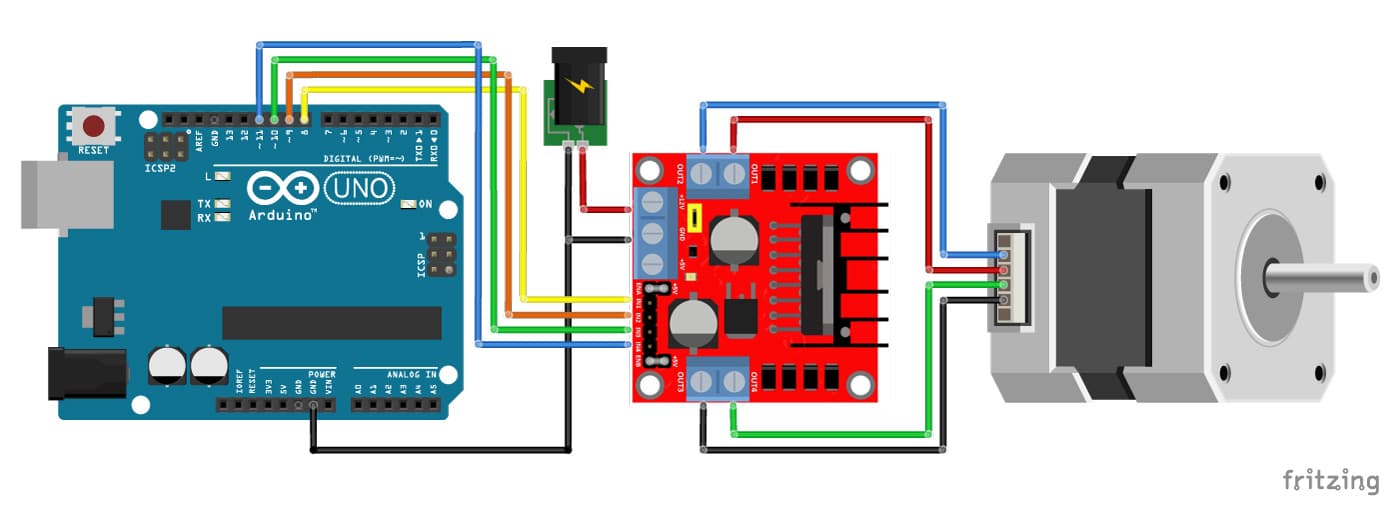
- Gather your supplies: Arduino Uno, L298N driver, breadboard, jumper wires, stepper motor, power supply (voltage matching your motor), and a USB cable.
- Wiring Wizardry:
- Power Supply: Connect the positive of your power supply to the L298N’s VIN pin and the negative to GND.
- Motor Connection: Connect your motor’s coils to the L298N’s output pins as per the specific motor datasheet. Remember polarity for bipolars!
- Arduino Control: Connect Arduino’s digital pins (e.g., 8, 9, 10, 11) to the L298N’s input and enable pins according to the chosen wiring diagram.
- Code Crafter:
- Download or write a stepper motor control library like AccelStepper.
- Define your desired movement in the code using functions like step(), direction(), and speed().
- Specify the number of steps, rotation direction, and desired speed.
- Power Up and Witness the Magic: Connect the USB cable to your Arduino and upload the code. If everything is connected correctly, your stepper motor should come alive, following your programmed commands!
Arduino Code for Arduino Stepper Motor Control using L298N
Here’s Arduino code for interfacing a stepper motor with an L298N driver, covering basic examples:
Simple Forward-Reverse Rotation:
#include <Stepper.h>

const int stepsPerRevolution = 200; // Adjust based on your motor's steps per revolution

// Define stepper motor connections:
Stepper myStepper(stepsPerRevolution, 8, 9, 10, 11);

void setup() {
  myStepper.setSpeed(60); // Set motor speed in RPM
}

void loop() {
  // Rotate 3 revolutions clockwise:
  myStepper.step(stepsPerRevolution * 3);
  delay(1000);

  // Rotate 3 revolutions counterclockwise:
  myStepper.step(-stepsPerRevolution * 3);
  delay(1000);
}
Continuous Rotation in One Direction:
#include <Stepper.h>

const int stepsPerRevolution = 200; // Adjust based on your motor's steps per revolution

// Define stepper motor connections:
Stepper myStepper(stepsPerRevolution, 8, 9, 10, 11);

void setup() {
  myStepper.setSpeed(60); // Set motor speed in RPM
}

void loop() {
  myStepper.step(1); // Rotate one step at a time
  delay(5); // Adjust delay for desired speed
}
Controlled Rotation with Input:
#include <Stepper.h>

const int buttonPin = 7; // Button for controlling rotation

const int stepsPerRevolution = 200; // Adjust based on your motor's steps per revolution

// Define stepper motor connections:
Stepper myStepper(stepsPerRevolution, 8, 9, 10, 11);

void setup() {
  myStepper.setSpeed(60); // Set motor speed in RPM
}

void loop() {
  if (digitalRead(buttonPin) == HIGH) {
	myStepper.step(1);
	delay(5);
  }
}
Using the AccelStepper Library for Advanced Control:
#include <AccelStepper.h>

const int stepsPerRevolution = 200; // Adjust based on your motor's steps per revolution

// Define stepper motor connections:
Stepper myStepper(stepsPerRevolution, 8, 9, 10, 11);

AccelStepper myStepper(1, 8, 9); // 1 = Number of motors (1 in this case)

void setup() {
  myStepper.setMaxSpeed(1000); // Set maximum speed in steps per second
  myStepper.setAcceleration(100); // Set acceleration in steps per second^2
}

void loop() {
  myStepper.moveTo(200); // Move 200 steps (adjust for desired rotation)
  myStepper.run(); // Start moving the motor
  while (myStepper.distanceToGo() > 0) {
	// Wait until the motor reaches its target position
  }
  delay(1000);
}
